TOPOGRAF
View Product Page
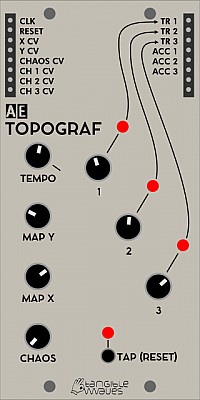
TOPOGRAF is a drum sequencer with three tracks, that works with a "topographic" principle; it contains a number of drum patterns arranged in a "virtual map"; and with two knobs MAP X and MAP Y you can set a position in this map. With one knob per channel the density is defined; and a CHAOS knob brings some randomness into the whole process. All in all a few knobs for a lot of drum patterns you probably wouldn't make this way by yourself - a nice source of inspiration and alo great for playing live.
TOPOGRAF is the AE modular version of the Grids module by Mutable Instruments. It is 100% identical to Grids. The user manual for that module can be found here. https://mutable-instruments.net/modules/grids/manual/
Module power consumption: 20 mA
Inputs
- CLK - this is a trigger input, you will need a divider module to control via midi clock and the Master module, see also advanced settings/modes below.
- Reset - Sets back to step 1 of the trigger sequence being played, and keeps sync with other triggered items if needed.
- X CV - In most cases this would be the trigger pattern over the steps of the "sequence" for track 1, although really it does more than this... Combined with the Map X Knob position.
- Y CV - In most cases this would be the trigger pattern over the steps of the "sequence" for tracks 2 and 3, although really it does more than this... Combined with the Map Y Knob position.
- Chaos CV - This will affect the amount of randomness in the Topograph's outputs depending on its level.
- CH 1 CV - This is combined with the Knob 1 position for the amount Output 1 will be triggered in the pattern.
- CH2 CV - This is combined with the Knob 2 position for the amount Output 2 will be triggered in the pattern.
- CH3 CV - This is combined with the Knob 3 position for the amount Output 3 will be triggered in the pattern.
To understand these inputs more clearly the Grids manual is recommended.
Outputs
- TR 1 - Track 1's output, the pattern is dependent on the X,Y setting, and the amount of triggers in the pattern are set by the CH1 CV and Knob 1.
- TR 2 -Track 1's output, the pattern is dependent on the X,Y setting, and the amount of triggers in the pattern are set by the CH2 CV and Knob 2.
- TR 3 -Track 1's output, the pattern is dependent on the X,Y setting, and the amount of triggers in the pattern are set by the CH3 CV and Knob 3.
- ACC1 - Extra trigger(s) on track 1 dependent on the pattern being used, (X,Y setting).
- ACC2 - Extra trigger(s) on track 2 dependent on the pattern being used, (X,Y setting).
- ACC3 - Extra trigger(s) on track 3 dependent on the pattern being used, (X,Y setting).
Controls
Detailed explanations of the various controls are given in this video.
https://youtu.be/BpRVdteMbfc
- RATE - if no external clock is given in CLK then this knob controls the clock rate of the sequence
- MAP X - selects the X position on the map of patterns
- MAP Y - selects the Y position on the map of patterns
- CHAOS - adds randomness to the pattern. Turn right for more randomness.
- FILL 1 - 3 these control the fill of triggers for each track. Turned completely anti-clockwise will mute that track.
Advanced Settings and Modes
The Topograf has the exact same program as MI Grids and the manual for Grids (see above) can be used. However here is a detailed explanation of the different advanced settings and modes.
Changing the clock resolution
You can change the clock resolution on the Topograf like this:
- unplug all CV and hold the TAP (RESET) button for a second to put the Topograph into advanced settings mode
- the FILL1 knob changes the clock resolution which you can as a pattern on the 3 LEDs
- 4ppqn = first LED is on
- 8ppqn = second LED is on
- 24ppqn = third LED is on
- Turn the FILL1 knob to select the resolution you want
- Hold the TAP (RESET) button again for a second to save the settings
You can experiment with 4 or 8 ppqn, but 24 ppqn is usually only useful if you want to clock the TOPOGRAPH directly from the MIDI bus.
The following video explains the advanced configuration options.
https://youtu.be/GLRYptx4Zmg
Patch Suggestions
Gaetan from the forum suggests:
Example for a bass line
- Trigger the envelope generator of your voice with the topograph's kick
- Patch the same kick trigger to your SEQ16 clock
- Patch the SEQ16 to control the pitch of your bass line
Now, every time topograph sends a kick, your sequence will advance one step.
More fun
- AND together the kick and snare, and use them to trigger your voice's EG
- Use the hihat to clock the SEQ16
You're going to have some pretty groovy bass lines with that
Or for a melody
- Clock your SEQ16 with a regular clock, and send the output to a Sample & Hold
- AND the HH and the kick, and use it to trigger both your voice's EG and the S&H
- Use the output of the S&H as you voice's pitch
You'll have a stable melody that will skip steps according to the state of the Topograf
| 
|
