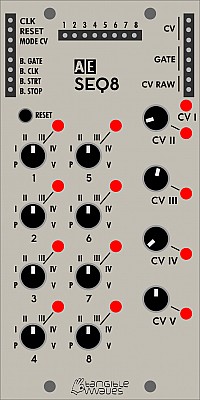
SEQ8
The SEQ8 is an 8-step sequencer for controlling oscillator pitch and triggering envelopes etc.
An 8 step sequence is great for dance music, basslines in particular. This is a reason to pick the SEQ8 over its bigger brother the SEQ16, that and needing less rack room. There are other slight differences too, in general the SEQ16 has more possibilities. There could be reasons to have both in a larger AE system!
Compared to "classic" analog sequencers the SEQ8 works a bit differently: Instead of setting the CV for each step independently (which means in fact "tuning" each step which can be a bit tedious), it has 4 knobs for presetting different CV's (= notes); each of the 8 step knobs selects one of these CVs, plus 0V (=base note) plus Pause (no trigger output). So some CVs have to be fine-tuned once; with the step knobs you can focus entirely on the sequence itself and you can even modify it on the fly, still remaining in tune.
Additionally to the selected CV presets, the "raw" value of the step knobs is also output.
Module power consumption: 7 mA
Inputs
- CLK - Clock, each +5V pulse moves the sequence to the next step.
- RESET - Puts the sequence being played back to step 1; this means any sequence length up to 8 steps can be generated.
- MODE CV -
The other sockets on the "input" side of the module are actually outputs so will be listed below.
Outputs
On the left side of the module:
- B. GATE - This is +5V as long as a key is pressed on a midi keyboard connected via the Master module.
- B. CLK - This is the midi clock via a device connected via the Master module; as this is 24 pulses per quarter note, this will need dividing down to the required tempo using one of the divider modules in the AE system.
- B. STRT - A single pulse generated when the start key is pressed on a midi device connected via the Master module.
- B. STOP - A single pulse generated when the stop key is pressed on a midi device connected via the Master module.
In the middle of the module:
- 1-8 - these are individual outs for each step of the sequence, it is however just a +5V trigger, not a CV. Still useful, the main job it is for is to set the sequence length with the reset input.
On the right side of the module:
- OUT (x3) - the CV generated by the sequence
- GATE (x3) - this generates a +5V signal for each step, unless the step is set to P (pause) or ACC (accent, more below)
- CV RAW (x2) - this is the CV generated by the actual step knob, so it changes with each step but not to the CV set by the relevant CV knob. useful for modulation effects.
Controls
- Knobs 1-8 - One for each step of the sequence; it can be set to positions 1 to 5 (in Roman numerals), which correspond with the relevant CV knob at the bottom of the module. In these positions a gate signal is also sent to the gate outputs. There is also P (pause, no trigger is sent to the gate output although the CV of the previous step will still be provided on the CV out)
- CV 2 to 5 - CV 1 is 0 volts, so the CV will leave the pitch of your VCO (for instance) alone. CVs 2 to 5 are set by the relevant knob on the module.
LED Indicators
- 1 - 8 - one for each step of the sequence, lit when that step is "playing"
- CV1 to CV5 - lit when that CV has been selected by the current step in the sequence.
Patch Suggestions
RSKT has made this, very thorough, tutorial about this module:
Unless you have a non-Midi system, you will need either the Beat divider or MM Divider module to step down the very fast MIDI clock to a usable clock; the former is simpler but the latter gives you many more options....
https://wiki.aemodular.com/pmwiki.php/AeManual/BEATDIVIDER
https://wiki.aemodular.com/pmwiki.php/AeManual/MM-DIV
The main intention of this module is to provide pitch CV to oscillators, with the gate outputs for VCAs, envelope generators etc.
The individual trigger outs can also be used to vary your sequence, by using an attenuator again to give you control over the amount (pitch/filter amount etc.). If your input(s) are full, use a 4ATTMIX or similar to combine the CVs before going to the destination. The 2ATTCV and 4ATT/MIX give you the attenuation/ control required.
Taking the previous further, using one of the various outputs, individual trigger out to an envelope is good, you can affect the sound, e.g. filter cut off, vibrato, volume etc. This is a a large rabbit hole...
This manual is a community work in progress. If you would like to help out with completing this manual please send a PM to @admin at the AE Modular Forum. The status of each page can be seen on the Trello board at https://trello.com/b/HNd0dBt7/ae-manuals
