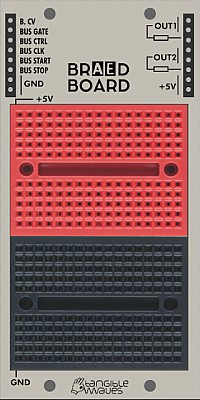
BRAEDBOARDThe BRAEDBOARD module contains a breadboard area for solderless electronics prototyping so you can experiment with any kind of analog or digital electronics and make your first steps into electronics, starting with simple circuits for beginners to developing your own module. It is supplied complete with some electronic components to get you started, these are listed on the Tangible Waves product page. InputsThere are no dedicated inputs at the top of the module. If your circuit needs input either from one or more of the onboard bus signals or from another module, you should patch it straight into the breadboard area. Outputs (on the left hand side)The left hand side offers convenient outputs to get access to the bus signals.
Outputs (on the right hand side)The outputs on the right hand side are "protected" by a 1k resistor so you can patch the output from your circuit into the resistor symbol and then take the "protected" signal from OUT1 or OUT2.
Upper / Red breadboardThe leftmost row of the breadboard is connected to +5V. Lower / Black breadboardThe leftmost row of the breadboard is connected to ground. ControlsThere are no controls per default on this module, but it comes with a pre-soldered PCB with two potentiometers which you can incorporate into your circuit. Patch SuggestionsPlease see a (growing) number of projects in the DIY section of the Wiki. |
This manual is a community work in progress. If you would like to help out with completing this manual please send a PM to @admin at the AE Modular Forum. The status of each page can be seen on the Trello board at https://trello.com/b/HNd0dBt7/ae-manuals
