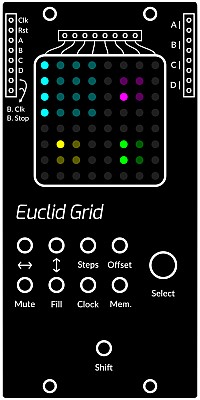
Euclid Grid
This is a 4 channel Euclidean step sequencer with a colourful animated display and hands on performance controls.
        Sequence  Display Colour
              A	   Cyan
              B	   Magenta
              C	   Yellow
              D	   Green
Module power consumption: 2.5 mA
Inputs
- Clk - External clock input
- Rst - When you apply a high level signal it pauses all signals for as long as the level is high
- A | B | C | D - Applying a high level signal to any of these inputs will activate the additional fill steps for the respective sequence for as long as the signal level is high
Outputs
- B. Clk - On the left hand side - outputs the bus MIDI clock signal
- B. Stop - On the left hand side - outputs the bus MIDI stop signal
- A | B | C | D - On the right hand side - (x2 each), outputs the triggers for each respective sequence
- "Column" Sockets (x8) - above the display. These will produce a trigger when a step of any sequence is in that output's column on the display, as marked by the lines below the sockets.
Controls
In this section the use of the encoder, (select knob) is designated by the ↻ symbol.
- Select knob. used to select the active sequence, the one the controls will affect. The selected sequence will flash until another button is pressed, or a few moments have passed before coming active.
How to move a sequence.
- ↔ + ↻ Moves the selected sequence left or right.
- ↕ + ↻ Moves the selected sequence up or down.
This can be for convenience, but moving the sequence side to side will affect the triggers produced by the sockets above the display....
How to modify a sequence.
- Steps + ↻ Changes the number of steps in the active sequence.
- Offset + ↻ Nudges the steps in the active sequence to the left or right.
- ↔ + Shift ↻ Changes the width of the sequence.
- ↕ + Shift ↻ Changes the height of the sequence.
- Steps + Shift ↻ Changes the length of the sequence.
- Shift ↻ Changes the step mode of the sequence,
Step modes determine how the sequence plays. These are the available modes:-
- Horizontal
- Horizontal Reverse
- Horizontal PingPong
- Vertical
- Random
How to perform a sequence.
- Mute Stops the active sequence from playing. Can be a toggle switch, or muted as the button is held down.
- Fill Adds additional notes to the active sequence. Can be a toggle switch, or the fill plays whilst the button is held down. If you want to trigger fills on the other sequences, you need to use the lettered inputs; in this way it is possible to have fills triggered on all 4 sequences simultaneously. The Gate output on the JOYSTICK module could be used, or the 6MUTE controlling +5V CVs from, for example, the 2ATTCV module.
What is a Fill? On Euclid Grid, a Fill is a secondary Euclidean sequence that is overlaid over the first. They are represented with the color white.
How to modify Fill parameters. Fills can be modified much like normal sequences via the following methods.
- Fill + ↻ Changes the number of steps in the selected fill.
- Fill + Steps + ↻ as per Fill + ↻.
- Fill + Offset + ↻ Nudges the steps in the selected fill to the left or right.
How to change the Internal clock.
- Clock Starts or stops the internal clock depending on state.
- Clock + ↻ Increases or decreases the tempo of the internal clock by 10.
- Clock + Shift ↻ Increases or decreases the tempo of the internal clock by 1.
All sequences will reset after three seconds of no clock being applied (internally or externally).
How to save and load a performance.
- Mem Loads the last saved state from memory.
- Mem + Shift Saves the current state to memory.
Patch Suggestions
Combining different sequences of different lengths can result in polymeter, (polyrhythms) especially odd and prime numbers (i.e. 5/8, 4/13). Highly recommended!
A Euclid sequence will always try to evenly space the triggers as much as possible, so X X X X o o o o o o o o o o o o would be impossible. If you make the right shape on the Grid display however, you can do this:-
X o o o X o o o X o o o X o o o is the sequence you would use, but display it as
- X o o o
- X o o o
- X o o o
- X o o o
and the key here is to then run the sequence in vertical mode. Variations on this idea are myriad....
The individual trigger outs can also be used to vary your sequence, by using an attenuator if needed to give you control over the amount. The 2ATTCV and 4ATTMIX give you the attenuation/ control required. Might also be good with the ADSR....
As this module can produce 4 independent patterns of triggers, plus the individual column outs, module like the LOGIC, 3VCSWITCH and OR2x4 may well be interesting...
Here is an introductory video by the 5th Volt...
and this one with some amazing patches towards the end by RSKT...
This manual is a community work in progress. If you would like to help out with completing this manual please send a PM to @admin at the AE Modular Forum. The status of each page can be seen on the Trello board at https://trello.com/b/HNd0dBt7/ae-manuals
